
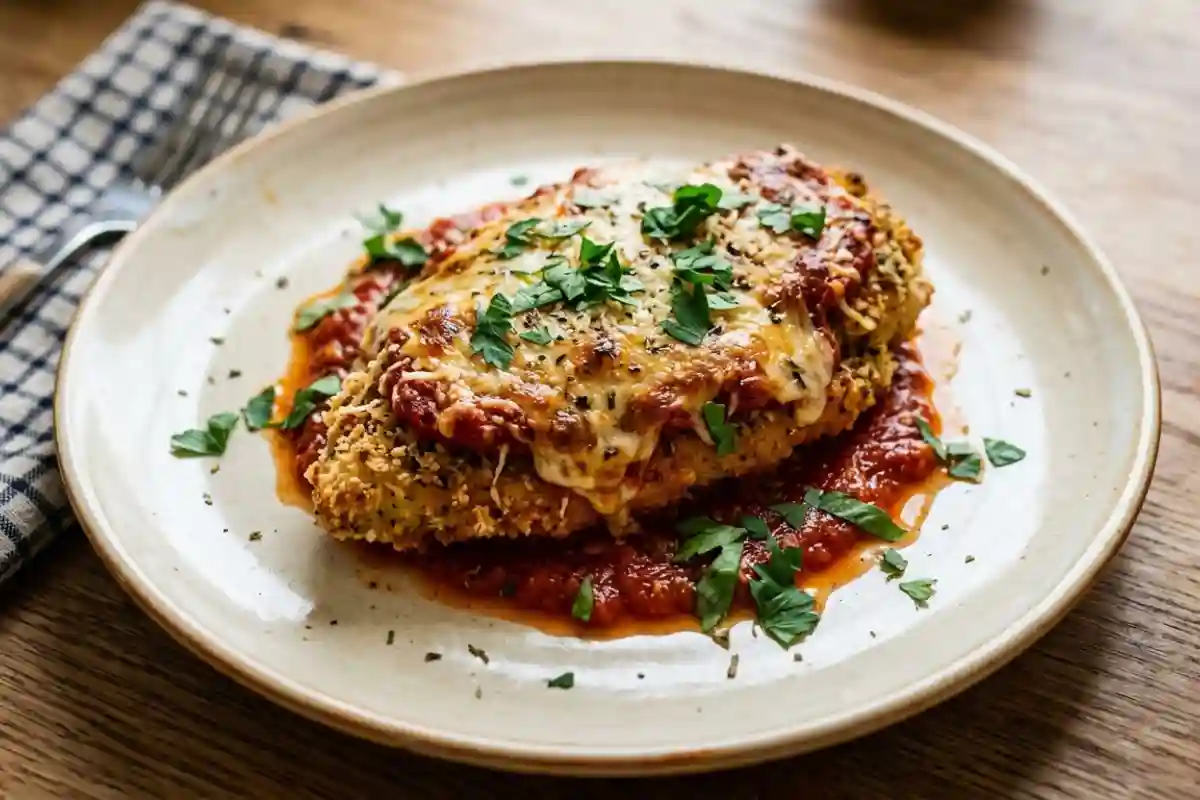
Few dishes in the Italian-American canon have the staying power of Chicken Parmesan. Pounded chicken breast, dredged in seasoned breadcrumbs, pan-fried until the crust turns deep gold, then finished under the broiler with marinara and molten mozzarella – it is a layered construction where every element has a job. The dish traces its roots to Italian immigrant communities in the northeastern United States, evolving from melanzane alla parmigiana (eggplant Parmesan) into the chicken version that became a fixture of red-sauce restaurants throughout the 20th century.
From a nutritional standpoint, a single serving built on a 170-gram chicken breast delivers upward of 42 grams of protein. The fat content depends almost entirely on how much oil carries the sear and how generously the mozzarella is applied, but a disciplined build stays well under 600 calories per plate. That makes this recipe genuinely viable on a weeknight without feeling like a concession.
If you’re working through Italian-American classics, Chicken Piccata shares the same thin-cutlet foundation but takes a completely different direction with lemon and capers rather than tomato and cheese.
Chicken Parmesan
Ingredients
Equipment
Method
- Pound and Season the Chicken: Place each chicken breast between two sheets of plastic wrap and pound with a meat mallet or rolling pin to an even 1.25cm / 0.5-inch thickness throughout. Uneven thickness is the most common reason some parts dry out before the crust finishes browning, so take a full minute per breast here. Season both sides with kosher salt, black pepper, and garlic powder, pressing the seasoning lightly into the surface.
- Set Up the Dredging Station: Arrange three shallow bowls in a line: flour in the first, beaten eggs in the second, and a mixture of Italian-seasoned breadcrumbs and 20g / 0.25 cup of the grated Parmesan in the third. The Parmesan in the breadcrumbs adds a faint nuttiness and helps the crust brown more deeply. Work with one cutlet at a time, pressing firmly into each bowl so the coating adheres without bare patches.
- Rest the Breaded Cutlets: Transfer the coated cutlets to a wire rack set over a baking sheet and let them rest at room temperature for 10 minutes. This short rest allows the breadcrumb coating to hydrate slightly and bond to the egg, which dramatically reduces the chance of the crust sliding off in the pan. Do not skip this step.
- Preheat Oven and Skillet: Position an oven rack in the upper-middle position and preheat the oven to 200°C / 390°F. Set a large oven-safe skillet over medium-high heat and add the neutral oil. The oil is ready when a pinch of breadcrumbs dropped in sizzles immediately and floats to the surface.
- Pan-Fry the Cutlets: Working in two batches, lower the breaded cutlets into the hot oil and fry for 3 minutes per side at medium-high heat. The crust should be a deep amber-gold and release cleanly from the pan when it is ready to flip – if it sticks, give it another 30 seconds. Avoid crowding the pan, which drops the oil temperature and produces a greasy, steamed crust rather than a seared one. Transfer the first batch to the wire rack while the second batch fries.
- Add Sauce and Cheese: Transfer all four seared cutlets into the skillet (or arrange on a foil-lined baking sheet if your skillet is too small). Spoon 3 tablespoons of warm marinara onto the center of each cutlet, keeping the edges of the crust exposed so they stay crisp in the oven. Lay two to three slices of mozzarella over the sauce, then scatter the remaining 20g / 0.25 cup of Parmesan across all four.
- Finish in the Oven: Slide the skillet into the preheated 200°C / 390°F oven and bake for 12 minutes, until the mozzarella is fully melted and bubbling at the edges. For light browning on the cheese, switch to the broiler on high for the final 2 minutes and watch closely – the difference between golden and scorched is about 60 seconds. Use an instant-read thermometer to confirm the thickest part of each cutlet reads 74°C / 165°F before pulling them from the oven. Rest for 3 minutes before plating.
- Plate and Finish: Transfer each cutlet to a warm plate and scatter fresh flat-leaf parsley over the top. Serve immediately while the crust retains its texture.
Notes
- Storage: Let the cutlets cool completely before transferring to an airtight glass or ceramic container. Refrigerate for up to 3 days, placing a sheet of parchment between any stacked pieces to keep the mozzarella from cementing the cutlets together.
- Reheating: Preheat the oven to 190°C / 375°F, place the refrigerated cutlets on a wire rack set over a baking sheet, and heat for 10 minutes. The rack keeps circulating air under the crust so it crisps back up instead of going soggy from steam trapped against the pan. Confirm the internal temperature reaches 74°C / 165°F before serving.
- Freezing: Freeze fully assembled and baked cutlets individually on a parchment-lined baking sheet for 1 hour, then transfer to zip-top freezer bags and store for up to 2 months. Reheat directly from frozen at 190°C / 375°F for 18 to 20 minutes on a wire rack, adding 2 minutes under the broiler to revive the cheese if needed.
- Equipment: An oven-safe cast iron skillet is ideal for this recipe because it retains heat evenly through the pan-fry stage and transitions directly into the oven without losing temperature. If you only have a stainless steel skillet with a heat-tolerant handle, it works equally well. Avoid nonstick skillets for the oven stage, as most nonstick coatings are not rated above 260°C / 500°F and the broiler can push surface temperatures well beyond that.
FAQ
Why does the breading fall off my Chicken Parmesan during frying?
The two most common causes are skipping the resting period after breading and moving the cutlets too soon in the pan. After dredging, the coating needs at least 10 minutes on a wire rack so the egg layer can set and bond the breadcrumbs to the chicken. In the pan, resist the urge to move or check the cutlet for the first 3 minutes – a properly seared crust releases naturally when it is ready. Patting the chicken dry with paper towels before seasoning also helps, because surface moisture steams the underside of the breading and weakens adhesion.
Can I make Chicken Parmesan ahead of time for a dinner party?
The cleanest make-ahead approach is to bread and pan-fry the cutlets up to 24 hours in advance, then refrigerate them uncovered on a wire rack. The exposed surface allows the crust to dry slightly, which actually improves its texture when it goes into the oven. When you are ready to serve, add the marinara and mozzarella and bake at 200°C / 390°F for 15 minutes from cold, adding 3 minutes to the original bake time to account for the chilled starting temperature. Fully assembling the dish with sauce and cheese and then refrigerating it overnight will make the crust soft, so that step is best saved for the day of.
What is the difference between Chicken Parmesan and Chicken Parmigiana?
They are the same dish. Chicken Parmigiana is the anglicized Italian name, while Chicken Parmesan (often shortened to Chicken Parm) is the term that took hold in Italian-American restaurant culture throughout the United States. The name itself does not actually refer to Parmesan cheese as the primary ingredient – it comes from melanzane alla parmigiana, the eggplant dish from the Campania and Sicily regions of Italy that this recipe is modeled after. In Italy, the chicken version is not a traditional dish; it is a product of the Italian-American immigrant kitchen.
Is it safe to cook the chicken directly from the pan to the oven without checking the temperature first?
An instant-read thermometer is the only reliable way to confirm doneness, and it should always be used on poultry. The USDA sets the safe internal temperature for chicken at 74°C / 165°F, measured at the thickest part of the cutlet away from the pan surface. Because the cutlets are pounded thin, they typically reach this temperature during the 12-minute oven phase, but thickness can vary and oven calibration differs between appliances. Color alone – even a golden-brown crust with bubbly cheese – is not a reliable indicator that the interior is safe to eat.
Can I use chicken thighs instead of chicken breasts for this recipe?
Boneless, skinless chicken thighs work well here and produce a noticeably juicier result because of their higher fat content. The trade-off is that thighs are harder to pound to a uniform thickness, which means the fry time needs more attention. Pound each thigh to approximately 1.5cm / 0.6-inch thickness, fry for 4 minutes per side instead of 3, and extend the oven time to 14 minutes. Confirm the same internal temperature of 74°C / 165°F before serving. The crust-to-meat ratio will be slightly different but the overall dish holds up well.
Why is my mozzarella releasing a lot of water and making the dish soggy?
Fresh whole-milk mozzarella has a high moisture content, and when it melts, it releases liquid directly onto the crust. There are two ways to manage this: either swap to low-moisture shredded mozzarella, which melts faster and stays more stable, or blot fresh mozzarella slices dry between sheets of paper towels for 15 minutes before use. A third option is to place the mozzarella slices on a wire rack over a plate and let them air-dry in the refrigerator uncovered for an hour before cooking. Keeping the marinara layer thin also helps, since excess sauce compounds the moisture problem underneath the cheese.